
Introduction
A Konica Minolta bizhub printer may produce sharp and clear text documents while grayscale images appear blurry, faded, or uneven. In some cases, periodic vertical black bands also appear on printed pages.
This type of image quality problem can be difficult to diagnose because ordinary text printing may appear normal even when grayscale reproduction is affected.
For the Konica Minolta bizhub 224, 284, 364, and 454 series, the imaging unit (IU) should be considered during troubleshooting, particularly the charging grid, OPC drum, and cleaning blade.
This guide explains how to identify the symptoms, eliminate possible software-related causes, inspect the imaging unit, and carry out the relevant maintenance procedures.
Important: The charging grid and OPC drum are possible causes, not automatic diagnoses. Confirm the actual cause through inspection and testing before replacing components.
Key Takeaways
- Clear text with blurry grayscale images may indicate an image reproduction problem rather than a general printing problem.
- Periodic vertical black bands can provide useful clues about rotating imaging components.
- The imaging unit (IU), charging grid, OPC drum, and cleaning blade should be inspected.
- Software and grayscale calibration checks should be performed before disassembling the machine.
- Waste toner buildup and a damaged cleaning blade may contribute to recurring drum-related image defects.
- Always confirm component compatibility and service procedures for the exact machine model.
1. Common Symptoms
The machine may show the following symptoms:
1.1 Text Prints Clearly
Ordinary Word documents, PDF text, and other text-based documents print with acceptable sharpness and density.
There may be no obvious problem with normal text output.
1.2 Grayscale Images Appear Blurry or Hazy
Photographs, grayscale test pages, and gradient patterns may show:
- Loss of fine image details
- Uneven grayscale transitions
- Hazy or blurred image areas
- Reduced contrast between different gray levels
1.3 Periodic Vertical Black Bands
Vertical black or dark bands may repeat at regular intervals.
In this repair scenario, the measured interval was approximately 240 mm, corresponding to the suspected drum circumference.
The actual interval should be measured on the affected machine and compared with the circumference of the relevant rotating component. Do not assume that 240 mm is a universal specification for every model or imaging unit.
1.4 Basic Cleaning and Toner Replacement Do Not Solve the Problem
The following actions may have little or no effect:
- Cleaning the charging unit cleaning slider
- Running grayscale calibration
- Replacing the toner cartridge
If the symptoms remain, further inspection of the imaging unit may be necessary.
2. Understanding Why Text Can Be Clear While Grayscale Images Are Blurry
Text and grayscale images place different demands on the printing system.
Ordinary text often consists mainly of high-contrast edges and solid black areas. Grayscale photographs and gradient images require more accurate reproduction of intermediate density levels and subtle image details.
The electrophotographic imaging process must maintain consistent charging, exposure, development, and transfer conditions to reproduce these different tones.
If the charging system or OPC drum cannot maintain stable imaging conditions, grayscale reproduction may become uneven or lose detail.
Possible areas to investigate include:
- Charging grid contamination, deterioration, or abnormal electrical behavior
- OPC drum surface wear or damage
- Cleaning blade deterioration
- Developer or toner-related image density problems
A normal-looking text page does not completely rule out an imaging unit problem.
3. Step 1: Perform Software and Image Quality Checks
Before removing the imaging unit, eliminate possible driver and calibration-related causes.
3.1 Check the Printer Driver Settings
Open the printer driver’s printing preferences and review the image quality settings.
Depending on the driver version, available options may include:
- Text priority or text enhancement
- Bitmap compression
- Photo or image quality mode
- Raster or bitmap processing
- Print resolution
For diagnostic purposes, try a suitable photo or image quality setting and compare the output.
If the driver provides text-priority or bitmap-compression options, temporarily adjust them to determine whether they affect the grayscale image.
Do not assume that a particular resolution, such as 1200 dpi, is supported or appropriate for every driver and machine configuration.
3.2 Run Grayscale Calibration
Use the machine’s control panel to locate the grayscale or image quality adjustment function.
The menu path may vary by model and firmware. Follow the relevant service or operation documentation.
Run grayscale calibration and repeat the test if the procedure allows it.
Restart the machine if required by the procedure.
3.3 Print an Internal Grayscale Test Page
Print an internal test page or a suitable grayscale test pattern.
Check:
- Whether grayscale transitions are smooth
- Whether image areas remain hazy
- Whether periodic black bands are still visible
- Whether the same defects appear independently of the customer’s document
If the internal test page shows the same problem, continue with hardware inspection.

4. Step 2: Remove and Inspect the Imaging Unit (IU)
If software checks and calibration do not resolve the issue, inspect the imaging unit.
4.1 Remove the IU
- Turn off the machine and follow the model-specific power isolation procedure.
- Open the front cover.
- Release the imaging unit locking mechanism.
- Carefully pull out the black imaging unit horizontally.
- Place the unit on a clean, stable work surface.
Avoid unnecessary exposure of the OPC drum to strong light.
4.2 Inspect the Waste Toner Compartment
Check the waste toner compartment for:
- Excessive toner accumulation
- Compacted or hardened waste toner
- Abnormal toner buildup
- Signs of toner leakage
Remove accumulated waste toner using an appropriate cleaning method.
Do not leave compacted waste toner inside the unit when reinstalling a new drum or other imaging components.
4.3 Inspect the Cleaning Blade
Examine the cleaning blade and its contact edge.
Look for:
- Chipped or damaged edges
- Curling or deformation
- Hardened or deteriorated blade material
- Uneven contact with the OPC drum
A damaged cleaning blade may fail to remove residual toner consistently and can produce recurring image defects.
Replace it if inspection confirms that it is damaged or no longer functioning correctly.
4.4 Inspect the OPC Drum and Charging Grid
Carefully inspect the OPC drum and charging grid.
Look for:
- Abnormal discoloration
- Surface scratches or damage
- Visible contamination
- Oxidation or deterioration
- Abnormal deposits around the charging components
Visual inspection alone cannot confirm every electrical charging problem. Further testing may be required if the surface appears normal but the image defects remain.
5. Step 3: Replace the Charging Grid and OPC Drum if Necessary
If inspection and diagnosis indicate that the charging grid or OPC drum is defective, replace the affected components using compatible parts.
5.1 Disassemble the Imaging Unit
- Place the IU on a clean, soft work surface.
- Release the retaining clips on both sides.
- Separate the charging assembly carefully.
- Keep track of the original component positions and fasteners.
Avoid forcing plastic clips or applying excessive pressure to the assembly.
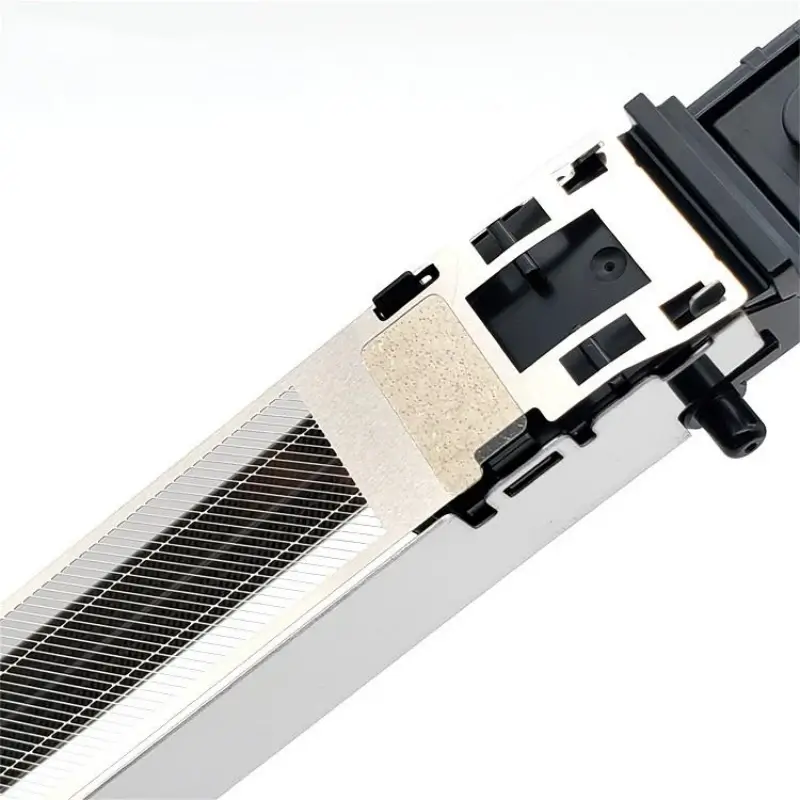
5.2 Replace the Charging Grid
- Remove the old charging grid.
- Clean loose toner or dust from the surrounding area using an appropriate non-damaging method.
- Do not use alcohol or unapproved solvents on the charging grid’s coated surface.
- Install the replacement grid in the correct orientation.
- Ensure that the retaining clips are fully engaged.
- Check that the grid is correctly positioned and that its electrical contacts are properly connected.
The charging grid must be installed without deformation.
5.3 Replace the OPC Drum
- Release the drum shaft or retaining sleeve according to the IU design.
- Remove the old OPC drum carefully.
- Handle the replacement drum by its end sections or designated handling areas.
- Avoid touching the photosensitive surface.
- Install the new drum in the correct orientation.
- Align the drive gear and shaft.
- Check that the drum rotates smoothly without abnormal resistance or noise.
Protect the OPC drum from strong light and physical damage throughout the procedure.
5.4 Clean the Waste Toner Area and Check the Cleaning Blade
Before reassembling the IU:
- Remove accumulated waste toner.
- Check for compacted toner around the cleaning blade.
- Inspect the blade contact edge.
- Replace a damaged blade when necessary.
- Confirm that no loose debris remains inside the unit.
Incorrect cleaning or excessive waste toner may cause further drum damage.
5.5 Reassemble the Imaging Unit
Reassemble the components in the reverse order of disassembly.
Check that:
- All clips and fasteners are secured.
- The charging grid is correctly positioned.
- The OPC drum rotates freely.
- Electrical contacts are properly connected.
- No component is rubbing against the drum.
- The unit is correctly assembled before installation.
Do not guess the required clearance between the charging grid and OPC drum. Follow the specifications for the particular IU assembly.
6. Step 4: Reinstall, Calibrate, and Test
After completing the repair, reinstall the imaging unit.
6.1 Reinstall the IU
- Carefully slide the IU back into the machine.
- Make sure it is correctly aligned.
- Secure the locking mechanism.
- Close the front cover.
- Power on the machine and allow it to complete its startup process.
6.2 Perform the Required Adjustments
Depending on the model and the components replaced, the machine may require image quality adjustment or calibration.
Check the service documentation before performing procedures such as TCR adjustment, toner concentration detection, or other initialization functions.
Do not run an initialization procedure simply because the OPC drum or charging grid has been replaced unless the service instructions require it.
6.3 Test in the Following Order
Test 1: Grayscale Test Page
Check whether the grayscale transitions are smooth and consistent.
Test 2: Photograph or Gradient Test Page
Check image detail, contrast, and density reproduction.
Test 3: Text Document
Confirm that text remains sharp and that the overall print density is consistent.
6.4 Expected Results
After a successful repair:
- Grayscale transitions should appear smooth.
- Image details should be clearly reproduced.
- The periodic vertical black bands should disappear.
- Hazy or blurred image areas should be corrected.
- Text should maintain consistent density without unwanted background contamination.
If the defects remain, continue diagnosis instead of repeatedly replacing the same components.
7. How to Distinguish Different Causes of Vertical Black Lines
Not every vertical black line is caused by the OPC drum or charging grid.
The following table provides a practical comparison.
| Possible cause | Typical symptoms | Diagnostic direction |
|---|---|---|
| Laser window or optical contamination | Uneven exposure, image density variation, or lines depending on the optical path | Inspect and clean the relevant optical windows according to the service procedure |
| Fuser roller damage or contamination | Marks may appear or change after the fusing process | Compare the image before and after fusing using the approved diagnostic procedure |
| Cleaning blade damage | Residual toner, sharp dark streaks, or recurring lines; text may also be affected | Inspect the blade edge and toner removal performance |
| Charging grid or OPC drum problem | Uneven grayscale reproduction, haze, and possible repeating drum-related marks | Inspect the charging system and drum surface; compare the repeat interval with component dimensions |
Diagnostic note: These are general troubleshooting clues, not definitive rules. The direction, spacing, shape, and location of the defect should all be considered. A repeating interval alone does not prove that the OPC drum is defective.
8. Common Repair Mistakes to Avoid
8.1 Using Alcohol on the Charging Grid Coating
Do not clean the charging grid with alcohol or other unapproved solvents.
An unsuitable cleaning agent may damage the surface coating or affect component performance.
Use only a cleaning method approved for the specific component.
8.2 Exposing the New OPC Drum to Strong Light
The OPC drum is photosensitive.
Avoid leaving it exposed to strong light for extended periods during installation or maintenance.
Follow the drum manufacturer’s handling instructions.
8.3 Installing a New Drum Without Cleaning the Waste Toner Compartment
Compacted waste toner may interfere with normal cleaning and can contribute to further contamination or drum damage.
Clean the waste toner area and inspect the cleaning blade before installing replacement components.
8.4 Replacing Toner Without Inspecting the IU
Adding or replacing toner cannot repair a damaged OPC drum, defective charging grid, or worn cleaning blade.
If the image defect originates in the imaging unit, toner replacement alone is unlikely to solve it.
8.5 Replacing Components Without Confirming the Cause
Do not automatically replace the OPC drum and charging grid whenever grayscale output appears blurry.
Inspect the components, compare test patterns, and verify the fault before ordering replacement parts.
9. Preventive Maintenance Recommendations
Regular imaging unit maintenance can help reduce recurring image quality problems.
Recommended maintenance practices include:
- Use the charging unit cleaning slider according to the machine’s maintenance instructions.
- Inspect and clean the waste toner compartment during scheduled IU maintenance.
- Check the cleaning blade for wear or damage.
- Avoid exposing the OPC drum to strong light.
- Use compatible replacement components.
- Follow the maintenance intervals specified for the machine and its operating environment.
The original field maintenance recommendation was to operate the charging cleaning slider every one to two months. Actual intervals should be adjusted according to print volume, operating environment, and the manufacturer’s maintenance guidance.
Frequently Asked Questions
Q1: Why does my Konica Minolta bizhub C364 print text clearly but grayscale images look blurry?
Text and grayscale images require different levels of image detail and density reproduction. A problem in the charging system, OPC drum, or other imaging components may affect grayscale reproduction even when ordinary text appears normal.
Q2: Can a damaged charging grid cause blurry grayscale printing?
A contaminated, deteriorated, or electrically abnormal charging grid may affect the charging conditions of the OPC drum. This can contribute to uneven image density and poor grayscale reproduction. Inspection and testing are needed to confirm the cause.
Q3: What causes periodic vertical black bands on Konica Minolta prints?
Possible causes include OPC drum surface defects, cleaning blade problems, toner contamination, or other rotating components in the imaging system. Measure the repeat interval and compare it with the relevant component circumference before identifying the source.
Q4: Should I replace the entire imaging unit if the OPC drum is defective?
Not necessarily. Depending on the IU design, compatible replacement parts may be available separately, including the OPC drum, charging grid, and cleaning blade. Confirm part compatibility and the manufacturer’s repair recommendations before purchasing individual components.
Q5: Will replacing the toner cartridge fix blurry grayscale images?
It depends on the cause. If the problem originates from the toner supply or development system, replacing toner may help. However, it will not repair a damaged OPC drum, charging grid, or cleaning blade.
Conclusion
When a Konica Minolta bizhub 224, 284, 364, or 454 prints text clearly but produces blurry grayscale images and periodic vertical black bands, the imaging unit should be included in the troubleshooting process.
Start with driver settings and grayscale calibration. If the problem remains, inspect the waste toner compartment, cleaning blade, charging grid, and OPC drum.
A systematic diagnosis can help technicians identify the defective component, avoid unnecessary replacement of the entire imaging unit, and restore consistent grayscale image quality.
This guide provides general troubleshooting information. Component configurations, adjustment procedures, and maintenance requirements may vary by model and firmware. Always consult the appropriate service documentation before performing repairs.

Leave A Comment