
Introduction
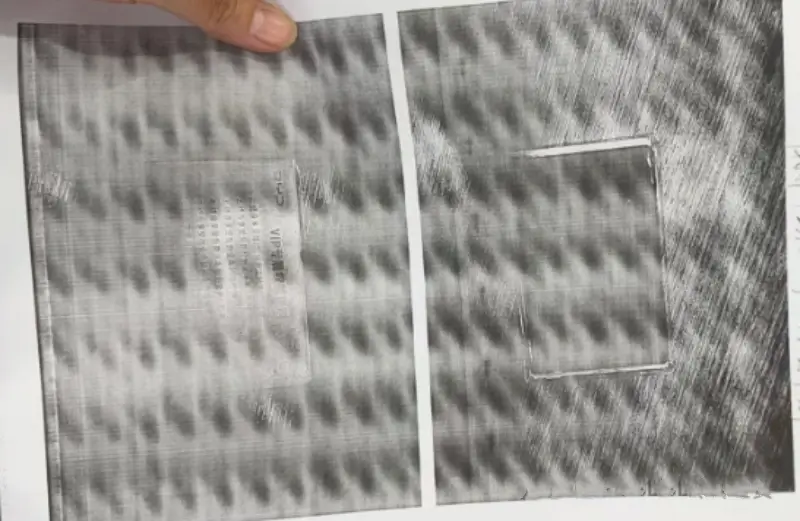
A Konica Minolta bizhub C368 or C558 may develop a serious image quality problem in which black prints show periodic wave patterns, uneven density, and irregular dark background contamination.
The problem may be particularly noticeable when printing solid black test pages, while color output may show only minor defects.
In one field repair case, the suspected root cause was wear in the black developer unit’s drive gear and shaft support components. Unstable rotation of the developer mixing mechanism and magnetic roller was associated with abnormal carrier leakage and toner concentration problems.
The investigation also found that damaged or deteriorated developer seals could allow carrier and toner to escape from the developer housing.
This article explains the possible relationship between developer gear wear, unstable developer rotation, carrier leakage, TD sensor behavior, and recurring black background defects.
It also provides a practical inspection and repair sequence for technicians working on Konica Minolta C368 and C558 machines.
Key Takeaways
- Periodic wave patterns and uneven black background may indicate a problem inside the black developer unit.
- Worn drive gears or shaft supports can cause excessive play and unstable mechanical operation.
- Damaged developer seals may allow carrier and toner to leak from the developer housing.
- Carrier contamination around the drive mechanism may contribute to further mechanical wear.
- Replacing gears without checking the shafts, bushings, and seals may result in recurring problems.
- After repairs, perform the model-specific developer initialization and image quality adjustments required by the service documentation.
1. Common Symptoms
The affected machine may show the following symptoms:
1.1 Periodic Wave Patterns on Black Prints
Black output may show repeating wave-like patterns.
The density may alternate between darker and lighter areas, creating irregular stripes across the printed page.
1.2 Uneven Black Background
The black test page may show:
- Uneven toner density
- Repeating dark and light bands
- Irregular background contamination
- Visible wave patterns across the page
The defect is often more obvious on solid black test pages than on ordinary text documents.
1.3 Black Printing Is More Seriously Affected Than Color Printing
In this repair case, the black-only test page showed the most obvious defects.
Color printing showed no obvious problem or only minor image quality abnormalities.
This difference suggests that the black imaging and development system should be inspected carefully.
1.4 Abnormal Noise from the Developer Unit
Some machines may produce abnormal mechanical sounds, including:
- Rattling noises
- Clicking sounds
- Grinding or sand-like noises
- Intermittent gear slipping sounds
These noises may indicate excessive mechanical play, worn gear teeth, or abnormal contact between drive components.
Noise alone is not sufficient to identify the failed component, but it is an important inspection clue.
2. Understanding the Possible Root Cause
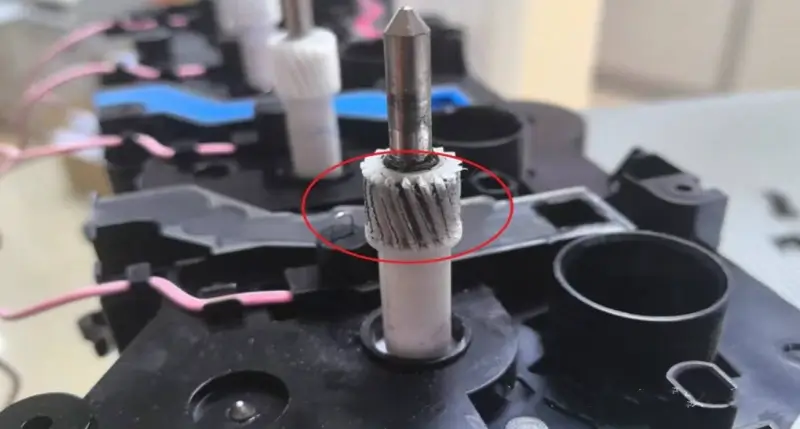
The main suspected mechanism in this repair case involves wear in the black developer unit’s drive gear and shaft support components.
The possible failure sequence is:
Worn developer drive gears or shaft supports → unstable rotation of the mixing mechanism and magnetic roller → vibration and abnormal mechanical operation → deterioration or failure of developer seals → carrier leakage → abnormal toner concentration control → excessive toner replenishment or density instability → periodic wave patterns and black background defects.
Each stage should be confirmed during inspection.
2.1 Worn Developer Drive Gears
The drive gears transmit power to the developer mixing mechanism and other rotating components.
When gear teeth become worn, damaged, or partially broken, the drive system may develop excessive play.
This can cause unstable mechanical operation and may produce intermittent slipping or abnormal noise.
2.2 Excessive Shaft or Bushing Clearance
The gear itself may not be the only worn component.
If the shaft, bearing surface, or supporting bushing becomes worn, the gear may no longer maintain stable engagement.
This is why replacing only the gear without checking its shaft and support components is not recommended.
A new gear installed on a worn shaft may quickly develop similar problems.
2.3 Damaged Developer Seals
The developer unit contains several sealing components designed to prevent toner and carrier from escaping.
Important areas to inspect include:
- Seals at both ends of the rotating shafts
- Sponge sealing strips
- Magnetic roller toner control seals
- Other sealing materials around the developer housing
If these components become hardened, detached, deformed, or damaged, carrier and toner may escape from the developer compartment.
2.4 Abnormal Carrier Leakage and TD Sensor Readings
Carrier and toner must maintain an appropriate relationship inside the developer unit.
If carrier leakage occurs, the developer mixture may become unbalanced.
The TD sensor monitors developer-related toner concentration conditions. Abnormal readings may affect the machine’s toner replenishment control, depending on the model’s control logic.
If the machine continues to replenish toner under abnormal conditions, the developer mixture and image density may become increasingly unstable.
The exact relationship between carrier loss, TD sensor readings, and toner replenishment should be verified using the service documentation and diagnostic data for the specific model.
3. Step 1: Inspect the Black Developer Drive Gear Assembly
Remove the black developer unit according to the service procedure for the C368 or C558.
Inspect the drive gear assembly carefully.
3.1 Check the Gear Teeth
Look for:
- Worn or rounded gear teeth
- Broken or chipped teeth
- Uneven tooth surfaces
- Abnormal gear engagement
- Signs of repeated slipping
If the gear teeth show significant wear, further inspection of the shaft and supporting components is necessary.
3.2 Check the Shaft and Bushing
Inspect the shaft and its supporting bushing or bearing surfaces.
Check for:
- Excessive clearance
- Side-to-side movement
- Abnormal looseness
- Uneven wear
- Abnormal rotation resistance
A noticeable amount of free movement in the mixing shaft may indicate wear in the supporting components.
Important: Do not replace the gear alone if the shaft or bushing is also worn. The entire mechanical support arrangement should be checked before installing replacement parts.
4. Step 2: Inspect the Developer Unit Seals
After inspecting the drive assembly, check the sealing components inside the developer unit.
Focus on the following areas:
4.1 Shaft End Seals
Inspect both ends of the rotating shafts.
Look for hardened, deformed, detached, or damaged sealing materials.
A failed shaft seal may allow developer material to escape during operation.
4.2 Sponge Sealing Strips
Check the sponge sealing strips around the developer housing.
Inspect for:
- Deterioration
- Loss of elasticity
- Detachment
- Compression damage
- Visible gaps
Damaged sponge seals may no longer provide sufficient containment.
4.3 Magnetic Roller Sealing Components
Inspect the toner control and sealing components around the magnetic roller.
Check whether the sealing material is correctly positioned and whether there are visible signs of toner or carrier leakage.
Replace damaged sealing components with compatible parts.
5. Step 3: Clean the Developer Unit and Surrounding Areas
Before installing replacement components, thoroughly clean the affected areas.
Important cleaning locations include:
- Inside the developer housing
- Magnetic roller area
- Mixing rods and shafts
- Gear assembly
- Drive mechanism around the developer unit
- Machine guides and surrounding internal areas
Remove accumulated toner, compacted powder, and escaped carrier.
Pay particular attention to areas where carrier has accumulated around the gears and shaft supports.
Residual carrier or toner contamination may interfere with component movement and contribute to further wear.
Use appropriate cleaning equipment and follow the manufacturer’s safety recommendations. Avoid spreading toner or carrier into other assemblies.
6. Step 4: Replace the Worn Components
The repair should address the mechanical wear and the sealing problem together.
6.1 Recommended Repair: Complete Mechanical and Sealing Repair
For a more reliable repair, inspect and replace the affected components as necessary:
- Developer drive gear set
- Worn shafts or bushings
- Shaft end seals
- Sponge sealing strips
- Magnetic roller sealing components
- Other damaged developer housing parts
If carrier condition has been compromised by leakage or contamination, replace it with the correct compatible developer material according to the model-specific service procedure.
Do not mix incompatible developer materials or reuse contaminated carrier without confirming that it remains suitable.
6.2 Temporary Repair: Replacing Only the Gear
Replacing only the worn gear may temporarily restore mechanical operation.
However, if the shaft, bushing, or sealing components remain worn, the problem may return.
This approach is not recommended as a long-term repair when the supporting components have also deteriorated.
7. Step 5: Reinstall, Initialize, and Calibrate
After completing the mechanical repair, reinstall the developer unit.
The following checks and adjustments should be performed according to the service documentation for the exact machine model.
7.1 Developer Initialization
If the developer material has been replaced, perform the required developer initialization procedure.
This may include TD-related initialization or other model-specific developer setup procedures.
Do not assume that the same initialization sequence applies to every Konica Minolta model.
7.2 Print a Solid Black Test Page
Print a solid black test page and inspect the output carefully.
Check for:
- Periodic wave patterns
- Uneven density
- Repeating dark and light bands
- Background contamination
7.3 Run Image Stabilization and Density Adjustment
Perform image stabilization and the required automatic density adjustments.
Follow the machine’s service documentation for the correct sequence.
7.4 Confirm Normal Operation
After adjustment, print several test pages.
Confirm that:
- Black density is consistent.
- Wave patterns have disappeared.
- No new carrier leakage is visible.
- The developer unit operates without abnormal noise.
- No new image defects appear during continuous printing.
8. Risks of Carrier Leakage
Carrier leakage should not be treated as a minor cleaning problem.
If carrier escapes from the developer unit, it may accumulate in surrounding machine assemblies.
Potential risk areas include:
- Drum units
- Transfer belt unit
- Internal drive components
- Machine guides and surrounding surfaces
Carrier particles are harder than ordinary toner particles. If they become trapped between moving or contacting surfaces, they may contribute to abrasion or surface damage.
For this reason, escaped carrier should be removed carefully before it spreads into other assemblies.
If contamination has reached the drum or transfer belt, inspect those components for scratches, embedded particles, and repeating image defects.
Do not assume that cleaning the developer unit alone will resolve secondary damage that has already occurred elsewhere.
9. Common Repair Mistakes to Avoid
9.1 Cleaning the Black Background Without Fixing the Mechanical Problem
Cleaning toner contamination or replacing toner may temporarily improve the appearance of the machine.
However, if the developer drive mechanism is still slipping or carrier is still leaking, the problem may return.
Identify and repair the underlying mechanical cause.
9.2 Replacing Only the Drive Gear
A worn shaft or bushing may cause a new gear to develop excessive play.
Inspect the complete drive assembly before ordering replacement parts.
9.3 Replacing Gears Without Repairing the Seals
If damaged seals remain in place, carrier may continue escaping from the developer unit.
This can contaminate the drive area and contribute to recurring mechanical problems.
9.4 Ignoring Escaped Carrier
Carrier remaining inside the machine may contaminate nearby assemblies.
Clean the affected areas and inspect the drum and transfer belt if carrier has reached those components.
9.5 Skipping Developer Initialization
When developer material has been replaced, failing to perform the required initialization may leave the machine using inappropriate previous control values or adjustment data.
Follow the model-specific initialization and calibration procedure after repair.
10. Quick Diagnosis: Developer Drive Problem or Drum Problem?
A repeating image defect can help technicians identify which assembly requires further inspection.
However, the repeat interval alone is not enough to confirm the cause.
| Observation | Possible direction | Recommended inspection |
|---|---|---|
| Periodic wave patterns mainly on solid black pages | Black developer unit or its drive mechanism | Inspect developer gears, shafts, mixing rods, and seals |
| Abnormal rattling or slipping noise | Mechanical drive wear | Check gear teeth, shaft clearance, and gear engagement |
| Visible carrier around the developer unit | Developer sealing failure | Inspect shaft seals, sponge seals, and magnetic roller sealing components |
| Repeating marks matching the drum circumference | Drum-related image defect | Inspect the OPC drum, charging components, and cleaning blade |
| Fixed marks appearing at intervals matching the transfer belt or another rotating component | Transfer system or other rotating assembly | Measure the repeat distance and inspect the corresponding component |
Technician tip: Print a solid black test page and measure the distance between repeating defects. Compare the measured interval with the circumference of the drum, magnetic roller, transfer belt, and other relevant rotating components.
If the interval does not match the drum circumference, do not immediately replace the drum. Continue investigating the developer unit and other rotating assemblies.
11. Technician Maintenance Checklist
Use this checklist when troubleshooting periodic wave patterns and black background on a Konica Minolta C368 or C558.
- ☐ Print a solid black test page and record the defect pattern.
- ☐ Check whether color output is also affected.
- ☐ Listen for abnormal developer drive noise.
- ☐ Remove and inspect the black developer unit.
- ☐ Check drive gear teeth for wear or damage.
- ☐ Inspect shafts and bushings for excessive clearance.
- ☐ Check both shaft end seals.
- ☐ Inspect sponge sealing strips and magnetic roller seals.
- ☐ Look for carrier leakage around the developer housing.
- ☐ Clean the developer unit and surrounding drive area.
- ☐ Replace worn gears, shafts, bushings, and seals as necessary.
- ☐ Replace developer material if required by the repair condition.
- ☐ Perform the correct developer initialization procedure.
- ☐ Run image stabilization and density adjustments.
- ☐ Print several black and color test pages.
- ☐ Check for recurring wave patterns, carrier leakage, and abnormal noise.
Conclusion
Periodic wave patterns and uneven black background on Konica Minolta bizhub C368 and C558 machines may be associated with wear in the black developer unit’s drive mechanism.
Worn gears, excessive shaft clearance, and deteriorated seals can contribute to unstable developer operation and carrier leakage.
Replacing only the drive gear without checking the supporting shaft, bushings, and sealing components may lead to recurring problems.
A systematic repair should include mechanical inspection, seal replacement where necessary, thorough cleaning, appropriate developer replacement, and model-specific initialization and calibration.
Identifying the underlying cause is more effective than repeatedly cleaning the black background or replacing toner without addressing the developer unit.
This article is based on field troubleshooting observations. The exact relationship between developer gear wear, carrier leakage, TD sensor readings, and toner replenishment may vary by machine configuration and firmware. Always consult the appropriate service documentation before performing repairs.

Leave A Comment