
Introduction
When a Konica Minolta printer displays the C3205 paper jam error, technicians should first check the paper transport path between the registration section and the fuser/output section.
The most important areas to inspect are the registration unit, fuser unit, paper transport rollers, and related paper sensors.
In many cases, the problem is caused by paper debris, mechanical resistance, a sticking sensor actuator, or an unstable registration clutch. Replacing the entire fuser or registration assembly without proper inspection may lead to unnecessary repair costs.
This guide explains how to identify the paper jam location, inspect the relevant components, and troubleshoot the C3205 error step by step.
Key Takeaways
- Primary inspection areas: Registration unit and fuser unit.
- First step: Identify exactly where the paper stops.
- Mechanical inspection: Check rollers, bearings, separation claws, gears, and registration clutch operation.
- Electrical inspection: Check sensor movement, sensor input signals, connectors, and wiring.
- Repair principle: Check mechanical resistance before investigating electrical signal problems.
- Avoid unnecessary replacement: Do not replace the complete fuser, registration assembly, or sensors before confirming the faulty component.
1. What Does the Konica Minolta C3205 Paper Jam Error Mean?
When a C3205 paper jam occurs, the troubleshooting priority is the paper transport process after the registration section and before the paper exits the machine.
The error may be associated with a paper transport timing problem, where the expected paper movement or sensor detection does not occur within the expected time.
The actual cause should be confirmed through the paper jam location, mechanical inspection, and sensor signal testing.
Main components to inspect:
| Component | Possible problem |
|---|---|
| Registration unit | Paper feeding delay or unstable paper transport |
| Registration rollers | Wear, contamination, or excessive resistance |
| Registration clutch | Insufficient torque or intermittent slipping |
| Fuser unit | Roller resistance or paper separation problems |
| Fuser separation claws | Paper catching or wrapping |
| Paper sensors | Sticking actuator or incorrect detection |
| Drive gears | Worn teeth, slipping, or abnormal engagement |
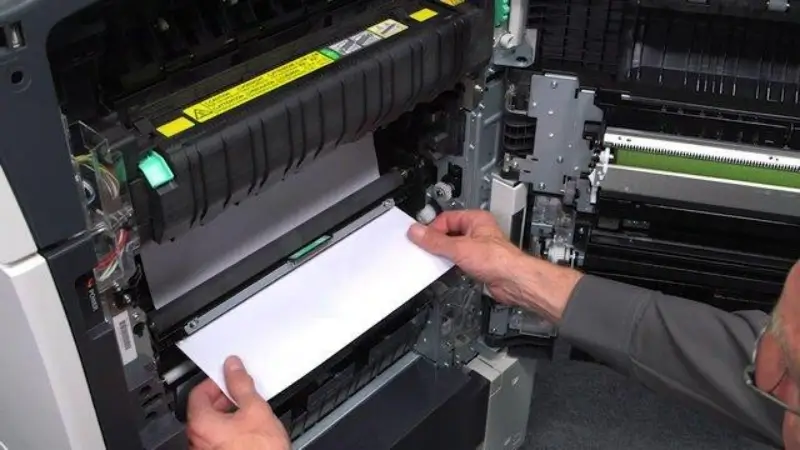
2. Identify the Paper Jam Location First
Before removing any components, carefully observe where the paper stops.
Two typical paper jam positions can help narrow down the inspection area.
Case 1: Paper Stops Between the Fuser and the Output Section
If the paper reaches the area between the fuser and the paper exit but cannot move out smoothly, inspect:
- Fuser rollers and their rotation.
- Fuser separation claws.
- Paper exit sensor actuator.
- Paper fragments around the output path.
- Related drive gears and mechanical connections.
A damaged separation claw, abnormal roller resistance, or a sticking exit sensor may interfere with normal paper transport.
Case 2: Paper Stops Below the Fuser Before Entering the Fuser
If the paper stops below the fuser and does not enter the fuser properly, focus on:
- Registration roller movement.
- Registration clutch operation.
- Paper transport resistance.
- Registration-related sensors and wiring.
- Drive gear engagement.
An intermittent registration clutch problem deserves particular attention because it may cause inconsistent paper feeding and can be overlooked during a quick inspection.
Important: Paper jam location is a diagnostic clue, not definitive proof that a particular component has failed. Confirm the cause through inspection and testing.
3. How to Troubleshoot the C3205 Paper Jam Error Step by Step
Follow this inspection sequence, starting with the simplest checks before moving to more complex diagnosis.
Step 1: Visually Inspect the Paper Path
Start with a basic inspection.
Check the registration section, fuser entrance, fuser exit, and paper output path.
Look for:
- Small pieces of torn paper.
- Paper dust or foreign objects.
- Sensor actuators blocked by debris.
- Broken, bent, or sticking sensor levers.
- Sensor actuators that do not return smoothly to their original position.
Clean any paper debris and make sure the sensor actuators move freely.
A small piece of paper blocking a sensor can sometimes cause a paper transport error.
Step 2: Check Mechanical Resistance
If the paper path is clear, inspect the mechanical components.
Check the following:
Registration rollers
- Inspect the roller surface for wear or peeling.
- Check whether the rollers rotate smoothly.
- Look for abnormal resistance or signs of contamination.
Fuser rollers
- Inspect the rollers for damage or surface deterioration.
- Check for abnormal resistance during an appropriate manual inspection.
- Look for paper wrapping or other obstructions.
Fuser separation claws
- Check whether the claws are damaged, worn, or catching paper.
- Inspect for toner buildup or foreign material.
Registration clutch
- Check whether the clutch engages and releases correctly.
- Look for intermittent slipping or insufficient torque.
Bearings and drive gears
- Check for dry or damaged bearings.
- Inspect gears for worn teeth, abnormal movement, or slipping.
If a mechanical component prevents the paper from moving smoothly, resolve that issue before replacing sensors.
Safety note: Switch off and disconnect the machine before manual mechanical inspection. The fuser can remain extremely hot after operation. Follow the manufacturer’s service procedures and allow the unit to cool before handling it.
Step 3: Check Sensor Operation and Electrical Signals
After confirming that the paper path and mechanical components are operating normally, inspect the relevant sensors.
Recommended checks:
- Enter the appropriate service mode according to the machine’s service documentation.
- Locate the relevant sensor input status.
- Manually operate the sensor actuator where the service procedure permits.
- Confirm whether the input status changes correctly.
- Clean the sensor’s optical surface if contamination is present.
- Inspect connectors and wiring for loose connections, damage, or poor contact.
If the sensor actuator moves normally but the input status does not change as expected, investigate the sensor itself, its wiring, and the associated electrical circuit.
Do not assume that a sensor is defective simply because a paper jam occurs near it.
Step 4: Investigate Advanced Mechanical and Timing Problems
If the previous checks do not identify the cause, move to more advanced diagnosis.
Pay particular attention to:
- Registration clutch torque problems.
- Intermittent clutch slipping.
- Worn or damaged drive gears.
- Abnormal gear engagement.
- Unstable paper transport timing.
- Firmware or control timing issues, where supported by further diagnostic evidence.
Firmware timing should be considered only after the mechanical components, sensor inputs, and related wiring have been checked.
Do not update firmware or change machine settings without confirming compatibility and following the appropriate service documentation.
4. Common Troubleshooting Mistakes to Avoid
Replacing parts too early is one of the most common causes of unnecessary repair costs.
| Incorrect approach | Recommended approach |
|---|---|
| Replacing the sensor immediately | Check the actuator, cleanliness, and input signal first |
| Replacing the complete fuser assembly | Inspect rollers, separation claws, and mechanical resistance |
| Replacing the registration assembly | Check the registration clutch, rollers, and drive gears |
| Ignoring intermittent faults | Observe clutch operation and paper feeding over repeated test cycles |
| Assuming the paper jam location identifies the failed part | Use the jam location to narrow down the inspection area, then confirm by testing |
| Investigating firmware first | Eliminate mechanical and electrical causes before considering timing issues |
5. A Practical Diagnostic Checklist for Technicians
Use this checklist during on-site troubleshooting.
- ☐ Identify the exact paper jam location.
- ☐ Remove all visible paper fragments.
- ☐ Inspect registration and fuser sensor actuators.
- ☐ Confirm that sensor levers move freely.
- ☐ Inspect registration rollers.
- ☐ Check fuser rollers.
- ☐ Inspect fuser separation claws.
- ☐ Check registration clutch operation.
- ☐ Inspect bearings and drive gears.
- ☐ Check sensor input signals.
- ☐ Inspect connectors and wiring.
- ☐ Perform a test print.
6. Frequently Asked Questions
Q1: What should I check first when a Konica Minolta C3205 paper jam occurs?
First, identify where the paper stops. Then inspect the registration unit, fuser unit, paper path, and related sensor actuators. Remove paper debris before proceeding to more complex checks.
Q2: Can a registration clutch cause an intermittent paper jam?
Yes. A registration clutch with insufficient torque or intermittent slipping may cause unstable paper transport. This type of problem can be difficult to identify during a brief inspection.
Q3: Should I replace the fuser when the paper stops near the fuser?
Not immediately. Check the fuser rollers, separation claws, mechanical resistance, and paper exit sensor first. Replace the fuser only after confirming that the assembly itself is defective.
Q4: Can a dirty paper sensor cause the C3205 error?
Yes. Paper dust, toner contamination, or debris may interfere with sensor operation. Clean the sensor area and check whether the actuator and electrical input work correctly.
Q5: What is the recommended troubleshooting order?
A practical order is:
- Check the paper jam location.
- Remove paper debris and inspect sensor actuators.
- Check mechanical resistance.
- Test sensor signals and wiring.
- Investigate clutch, gears, and advanced timing issues.
Conclusion
The key to troubleshooting the Konica Minolta C3205 paper jam error is to identify where paper movement stops and follow a systematic diagnostic process.
Start with the registration and fuser sections. Check for paper debris and sensor actuator problems, then inspect mechanical resistance before testing electrical signals.
Pay special attention to intermittent registration clutch slipping, damaged rollers, and fuser separation problems.
Remember this repair principle: Identify the paper jam location first, check mechanical resistance second, and verify electrical signals afterward.
A systematic inspection helps technicians avoid unnecessary part replacement, reduce troubleshooting time, and improve repair accuracy.
Disclaimer: This article is intended as a general troubleshooting reference for printer technicians. The exact diagnostic procedure and component layout may vary depending on the machine model and configuration. Always refer to the appropriate Konica Minolta service documentation before performing repairs.

Leave A Comment